Interactive filters?
Interactive filters let you filter report widgets directly from a homepage or dashboard without modifying the reports. ServiceNow ships many filter types out of the box, but sometimes you need to filter based on a catalog item / requested item variable, and the available interactive filters don’t cover that.
Fortunately, as an administrator you can create scripted filters and add them to dashboards and homepages. In this post we’ll build our own scripted interactive filter based on a catalog item variable.
Pre-requisites
- Knowledge of JavaScript/JellyScript — 6+ months
- Knowledge of HTML — 6+ months
- Knowledge of reports and filters — basic
- A catalog item with a variable to use for the scripted interactive filter
What are we building today?
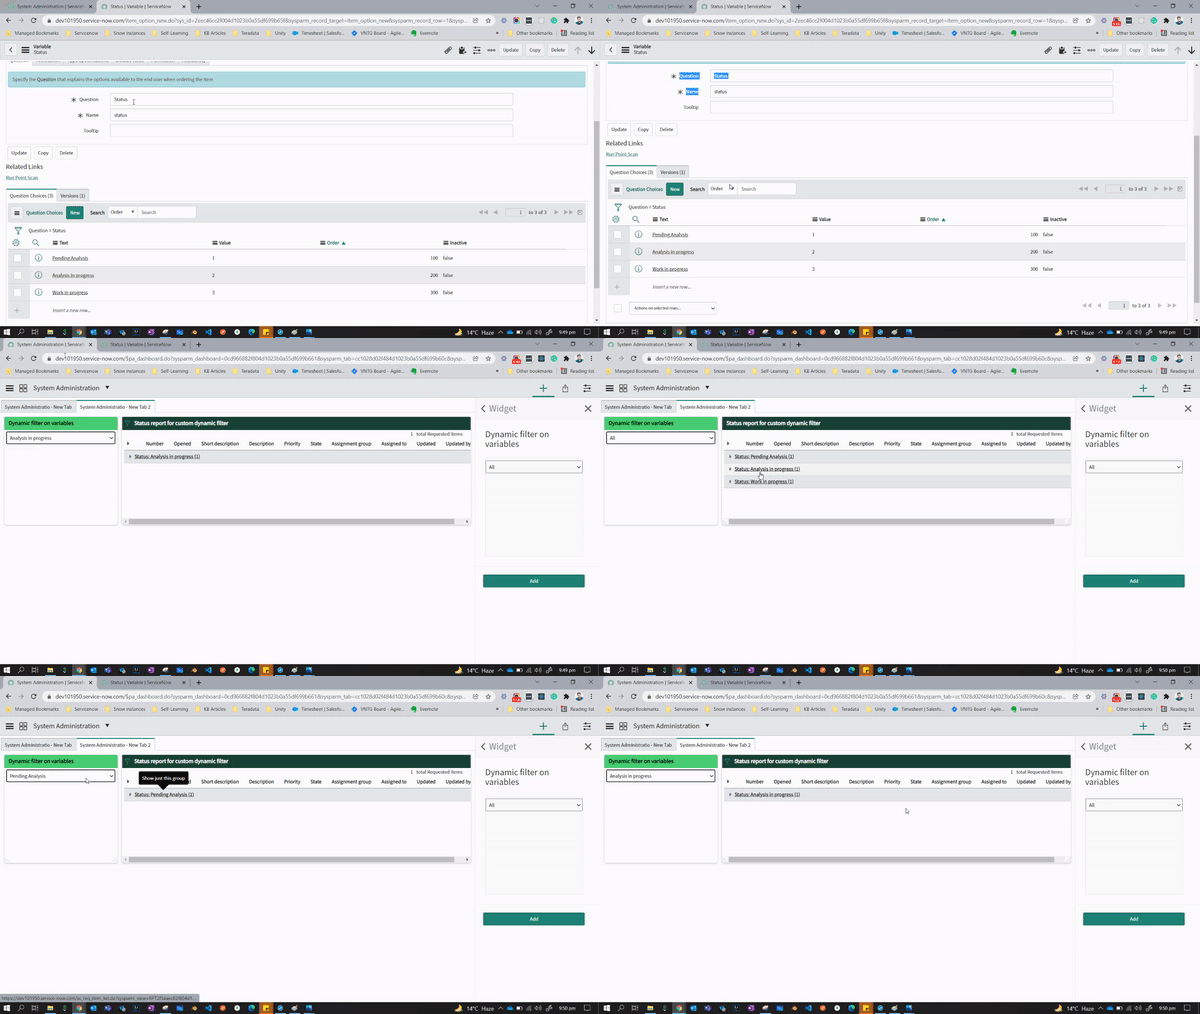
I have a catalog item that contains a variable named Status, of type select box. Three statuses are available as choices — pending analysis, analysis in progress, and work in progress. I’ll use that variable as a dashboard filter — selecting a status filters a requested item list report by that status.
Before diving into the development, here’s the end result:
Solution
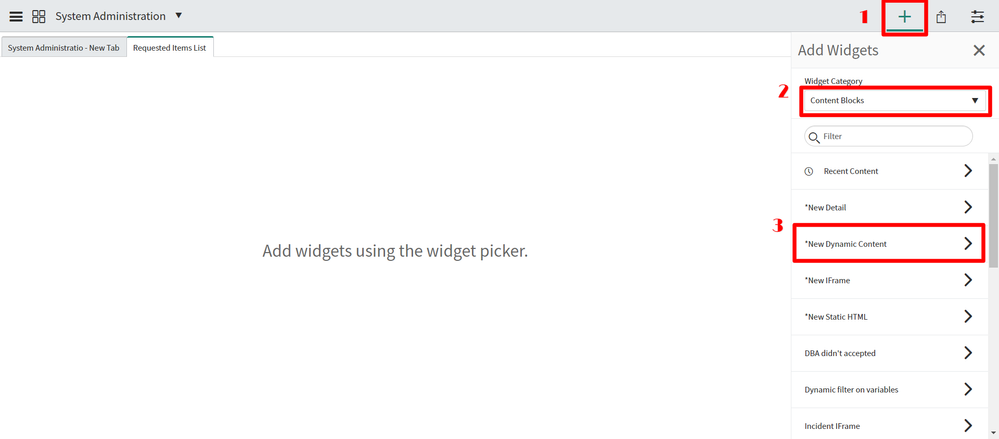
First, create a Dynamic Content page. Go to the target dashboard, click the plus/add widget icon in the grey header, and select Content Blocks from the widget category dropdown. Select “New Dynamic Content block” from the list and click Add. A new widget appears in the left content pane — click the “click here” link in its body.
A Dynamic Content Block form opens — this is where the scripting logic goes. Use the script below to create an HTML widget containing a dropdown with all the choices for the catalog item’s status variable.
Read the comments in the script carefully — you’ll need to make a few changes to match your environment.
<?xml version="1.0" encoding="utf-8" ?>
<j:jelly trim="false" xmlns:j="jelly:core" xmlns:g="glide" xmlns:j2="null" xmlns:g2="null">
<g:evaluate var="jvar_status" object="true" jelly="true">

var statusArray=[];
<!-- Get choices of select box [status] and pass it to the widget UI -->
var gr= new GlideRecord('question_choice');
  gr.addEncodedQuery('question=2eec46cc2f004d1023b0a55df699b65f'); <!-- replace the sys_id with the sys_id of your variable. -->
  gr.addOrderBy('name');
  gr.query();

  while(gr.next()){
    statusArray.push([gr.getValue('value'),gr.getValue('text')]);
  }

 statusArray;
</g:evaluate>

    <select id='filter_statuses' class='select2-search' onchange='filterStatus()'>
        <option value="">All</option>
        <j:forEach var="jvar_state" items="${jvar_status}">
            <option value="${jvar_state[0]}">${jvar_state[1]}</option>
        </j:forEach>
    </select>

    <script>
     var dbh = new DashboardMessageHandler("filter_status");

     function filterStatus(){
        var status = $j('#filter_statuses').val();
        if (status)
            dbh.publishFilter('sc_req_item', 'cat_item=c45927732f3b3c1023b0a55df699b636^variables.2eec46cc2f004d1023b0a55df699b65f=' + status); <!-- change the cat_item sys_id and variable.sys_id with actual sys id of catalog item and target variable. -->
        else
            dbh.removeFilter();
     }
     filterStatus();
</script>

</j:jelly>
After making the changes noted in the script’s comments, save the form.
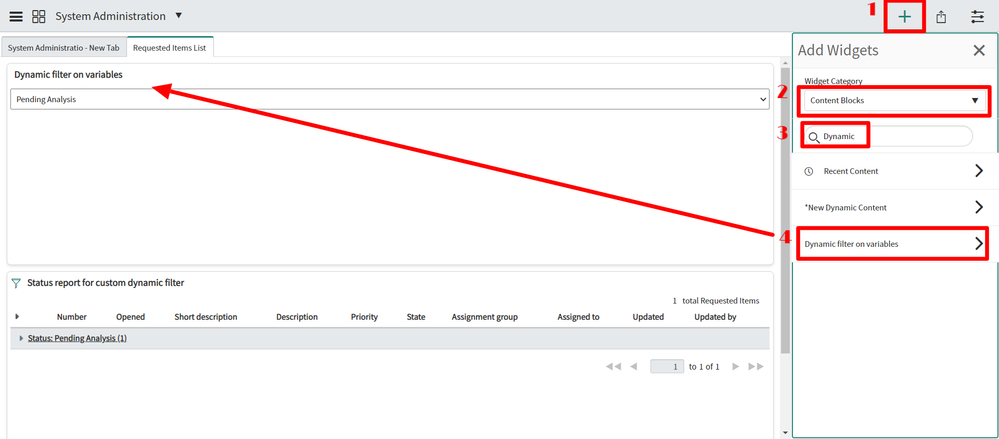
Open the dashboard — if the interactive filter doesn’t appear, click the add widget icon, select “Content block” as the widget category, and search for the block you just created by name.
Hover over the report widget’s title bar and select the settings cog to open its configuration. Check both “Follow interactive filters” and “Show when following interactive filters”.
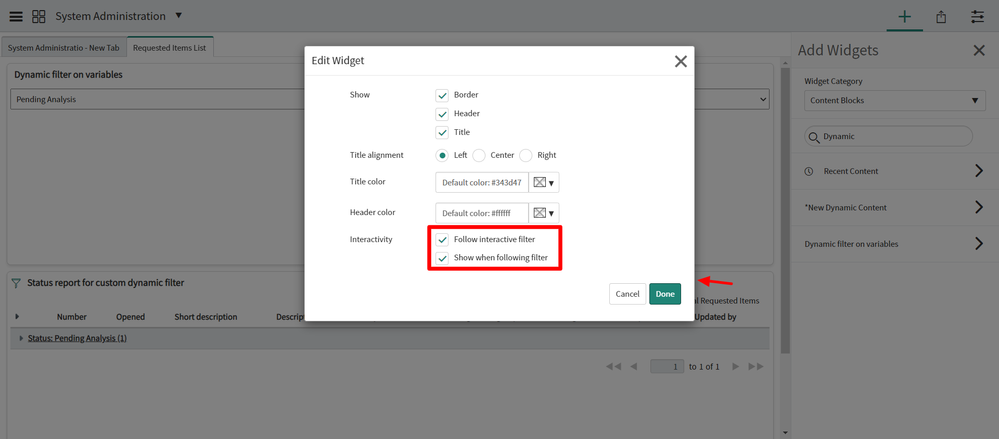
Congrats, you’re done! Changing the filter now filters the list of records based on the selection.
Reference: Publish and subscribe to interactive filters — ServiceNow Docs